Portant Docs
Launch PortantInstall App in Hubspot ↗︎
Portant Docs
Portant Docs
  • 👋Welcome
  • 🟢Product Updates
  • 🌱Getting Started
    • How to Sign up
      • Sign-up without a Google account
    • Quickstart
    • Ask for Help
      • Support Tickets
      • Support Codes
      • Screenshots
      • Developer Console
      • 400 Error
      • Resolve: API developer key is invalid error
      • How to request a transfer of your Portant account
    • Templates
    • Delete Multiple Workflows at Once
  • How to Set Up Your Account's Global Formatting Settings
  • Change Language Settings
  • 💫Personalise Documents
    • Adding Hyperlinks
    • Adding Images
    • Use custom tag names
    • Tag Formulas
      • Global tags
      • Tag Formulas
      • Tag IF Statements
    • Invalid Tags
    • Portant AI Content
    • Dynamic Google Sheets Charts
    • Tag Checker
    • Add online payment links
    • Add Stripe Payment Links to Your eSign Portal
  • 🌐Sources
    • Google Forms
      • Add formula fields to your Google Form workflow
      • {{tags}} for Google Forms
    • Google Sheets
      • Google Sheets Auto-create
      • How to source data from multiple Sheets
      • Saving Document Links to your Sheet
      • Data Grouping
    • HubSpot
      • How to install the Portant App in HubSpot
        • How to Add Portant App Cards to HubSpot
      • Create a Document in HubSpot
      • How to manage and select HubSpot Properties
        • Full list of available HubSpot Properties
      • Trigger HubSpot Workflows from Portant
      • Add a Portant Action to a HubSpot Workflow
      • How to view created documents in HubSpot
      • Add multiple line items into a single document
      • Add Deal Tags using Portant document statuses
      • Portant eSignatures + HubSpot
      • Review documents using the Review Block in HubSpot
    • Zapier
    • Glide
    • Webhooks
      • Webhook Data Grouping
    • Xero
    • Copper
      • Installing the Copper integration
      • Create your first Copper workflow
      • Generating your first document from Copper
    • Typeform
    • Tally
  • 💡Use Cases
    • eSignatures Requests
    • Incident Report
    • Quarterly Business Reviews
    • Invoices
    • Convert Form Responses to PDFs
  • ✒️eSignatures
    • Getting Started
    • Request Signatures (without a source)
    • Request Multiple Signatures
    • Customise Signature Request Email
    • Create Preview Links for Signature Requests
    • Resend signature requests
    • Cancel Signature
    • Add Audit to eSignatures
    • Request Info On Signing
    • eSigning Laws & Compliance
      • United States: E-SIGN Act and UETA ✅
      • Canada: PIPEDA and Electronic Transactions Act ✅
      • EU: eIDAS Regulation for Electronic Signatures ✅
      • UK: eIDAS Regulation and Electronic Communications Act 2000 ✅
      • Australia: Electronic Transactions Act (ETA) ✅
      • New Zealand: Electronic Transactions Act (ETA) 2002 ✅
      • Israel: Electronic Signature Law 2001
  • ⚡Automation
    • Workflow Filters
    • Re-run an automation
    • Review Block
    • Converting docs to different file types
      • Microsoft Word (.docx)
      • Microsoft Powerpoint
      • Create PDF outputs
      • Save an output as a Microsoft Excel file (.xlsx)
  • ✉️Emails
    • Share a Doc via Email
    • Email Tracking
    • Send from aliases
    • Send Outlook Emails
    • Customize Your Email Content with HTML Editing
  • 📄Outputs
    • Customize Output File names
    • Auto-filing Output Files
    • Changing Output Folder
    • Search and filter your outputs
  • Deleting Outputs in Portant
  • 🎁Portant Add-ons
    • Data Merge
      • How to set-up a Google Sheets source
        • Data Merge Settings for Google Sheets sources
        • Automatically create documents
      • How to set-up a Google Forms source
        • Data Merge Settings for Google Forms
        • Automatically create documents
        • Edit Response and Pre-filled Response Links
      • Inserting Images
      • Advanced Settings
        • Editing tag names
        • Timezone, date and time format settings
        • Editing the Output Folder
        • Conditional logic for emails
        • Conditional Logic for Data Merges
        • Data Grouping in Portant Data Merge
    • Document Merge - Trello Power-up
  • 👥Teams
    • Creating Your Team
    • Sharing Workflows
    • Creating Folders in the Workflows Tab
    • Managing team permissions
    • Whitelabeling eSign Portal
  • 💳Billing
    • Update Billing
  • Developer
    • Build with Portant
Powered by GitBook
On this page
  • How to set up your Google Sheet
  • How to process rows manually
  • How to turn on Auto-create (✨ Pro feature)
  • How to use Data Grouping

Was this helpful?

  1. Sources

Google Sheets

How to use Google Sheets as a source for your workflow

Previous{{tags}} for Google FormsNextGoogle Sheets Auto-create

Last updated 5 months ago

Was this helpful?

Google Sheets is a great source for a workflow if you already have data for the documents you want to create. This can already be in Google Sheets, or you can export the data from another platform in a csv and upload it to Google Sheets. In this guide we will show you how to:

  1. How to set up your Google Sheet

  2. Process Rows Manually

  3. Turn on Auto-create (✨ Pro feature)

  4. Data Grouping

How to set up your Google Sheet

When you set up your Google sheet, the first row ow your spreadsheet should contain your headers and then the data should be organised in rows underneath, like this:

How to process rows manually

There are two options to process data using a Google Sheet, you can set up Portant to process rows automatically or manually process them.

To process rows manually, click the 'Automate' button in the top right of the screen, here:

When you click the button a menu will open with options of how to automate the data. You can process all the data in the spreadsheet by clicking the start button here:

Or you can process a selection of the rows by changing the dropdown option 'Custom range' then entering a selection of rows, like this:

In this example we have selected to run rows 3 through to 5 and row 11. You can enter a dash (-) between two numbers if you want to select a range and you can enter multiple numbers separated by commas if you want each row processed.

How to turn on Auto-create (✨ Pro feature)

You can turn on Auto create by clicking the Automate button in the top right of the screen, here:

How to use Data Grouping

Feedback and feature suggestions

‍

Each row in your spreadsheet will create one document, unless you use our feature

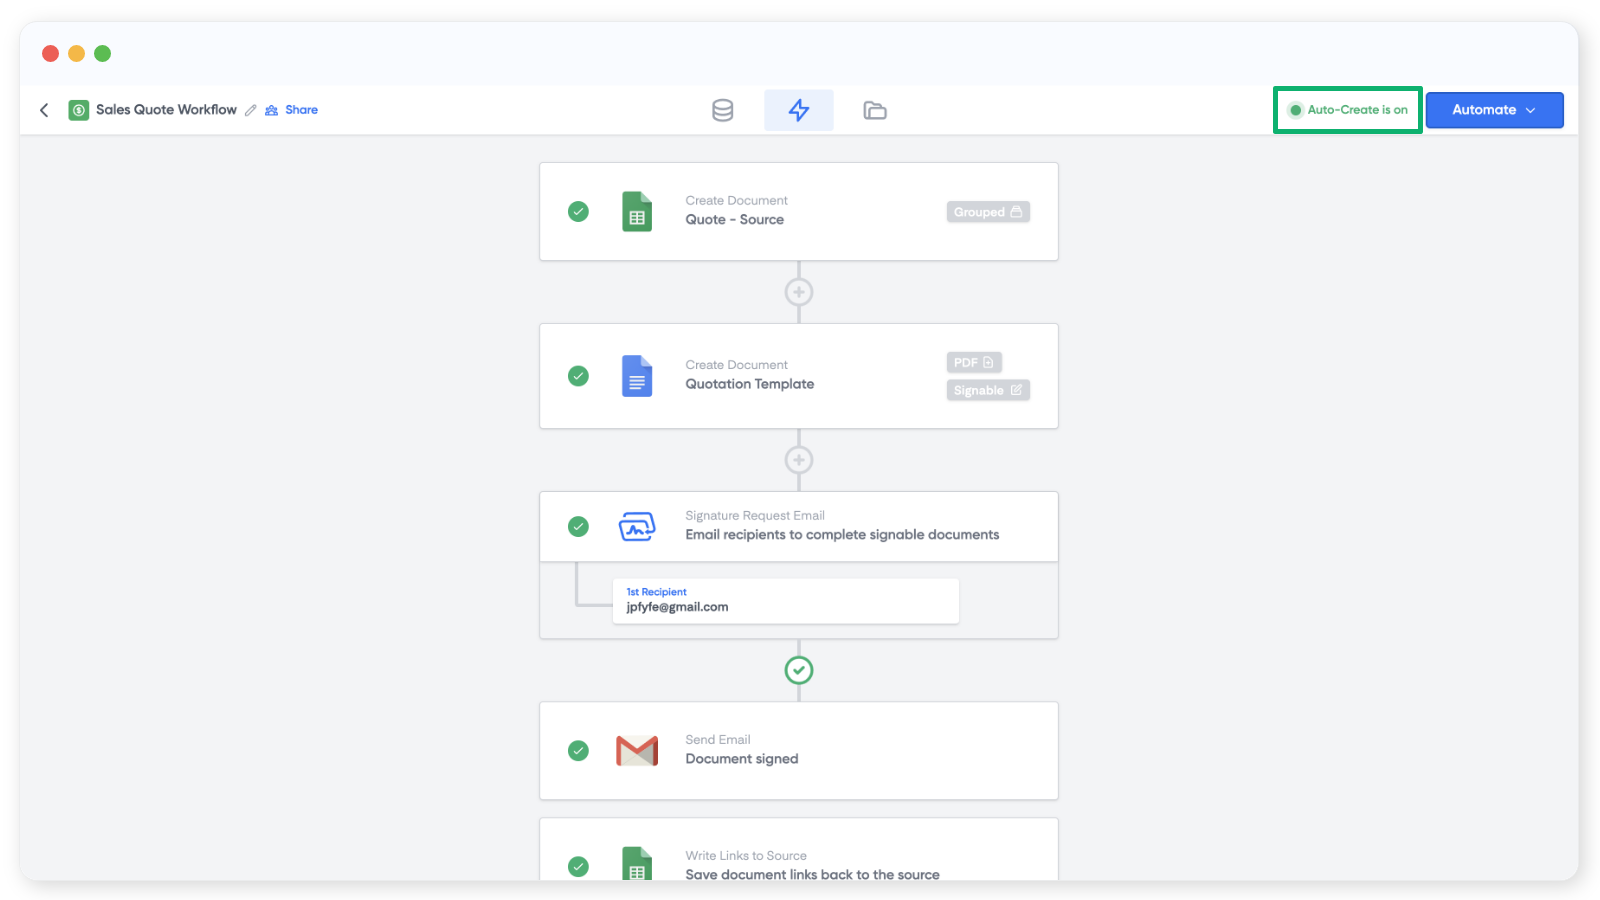
This means that every time new data is entered into your spreadsheet it will be processed. You can learn more about Auto-create in t. When it is switched on a status appears here:

If you can't see this status, Auto-create is not on.

Data grouping is a great feature if you need to place multiple rows from the same spreadsheet into the same document. For example if you have 5 rows with line item data for an invoice. You could use the invoice number to group the information and enter it into the same documents. You can learn more about Data Grouping in .

We created Portant in 2021, and the feedback we have received since then has been very helpful and greatly appreciated. If you have any feedback, please feel free to send us an email at

🌐
Data Grouping
his article
this article
contact@portant.co